
Introduction to Holographics
> A typical way Holographics might be used in production
Holographics is the fastest and easiest way to add live graphics to your videos. Easily overlay lower-thirds, broadcast messages, ticker tapes and your own custom widgets & themes on any live video feed. Or output Key & Fill signals using a supported application.
It was created by Stream My Event, a livestream production house based in Amsterdam, out of a need to have simple basic graphics capability at every production with zero additional prep time.
Holographics is not intended to be a fully-fledged all-inclusive tool to do custom graphics for complicated projects, rather it is meant to be the 'baseline' for easy graphics. The system you go to if you don't need complex things. We intend it to be the always-on, always ready to go solution for baseline graphics, easily and quickly resettable and adjustable with good defaults.
How does it work?
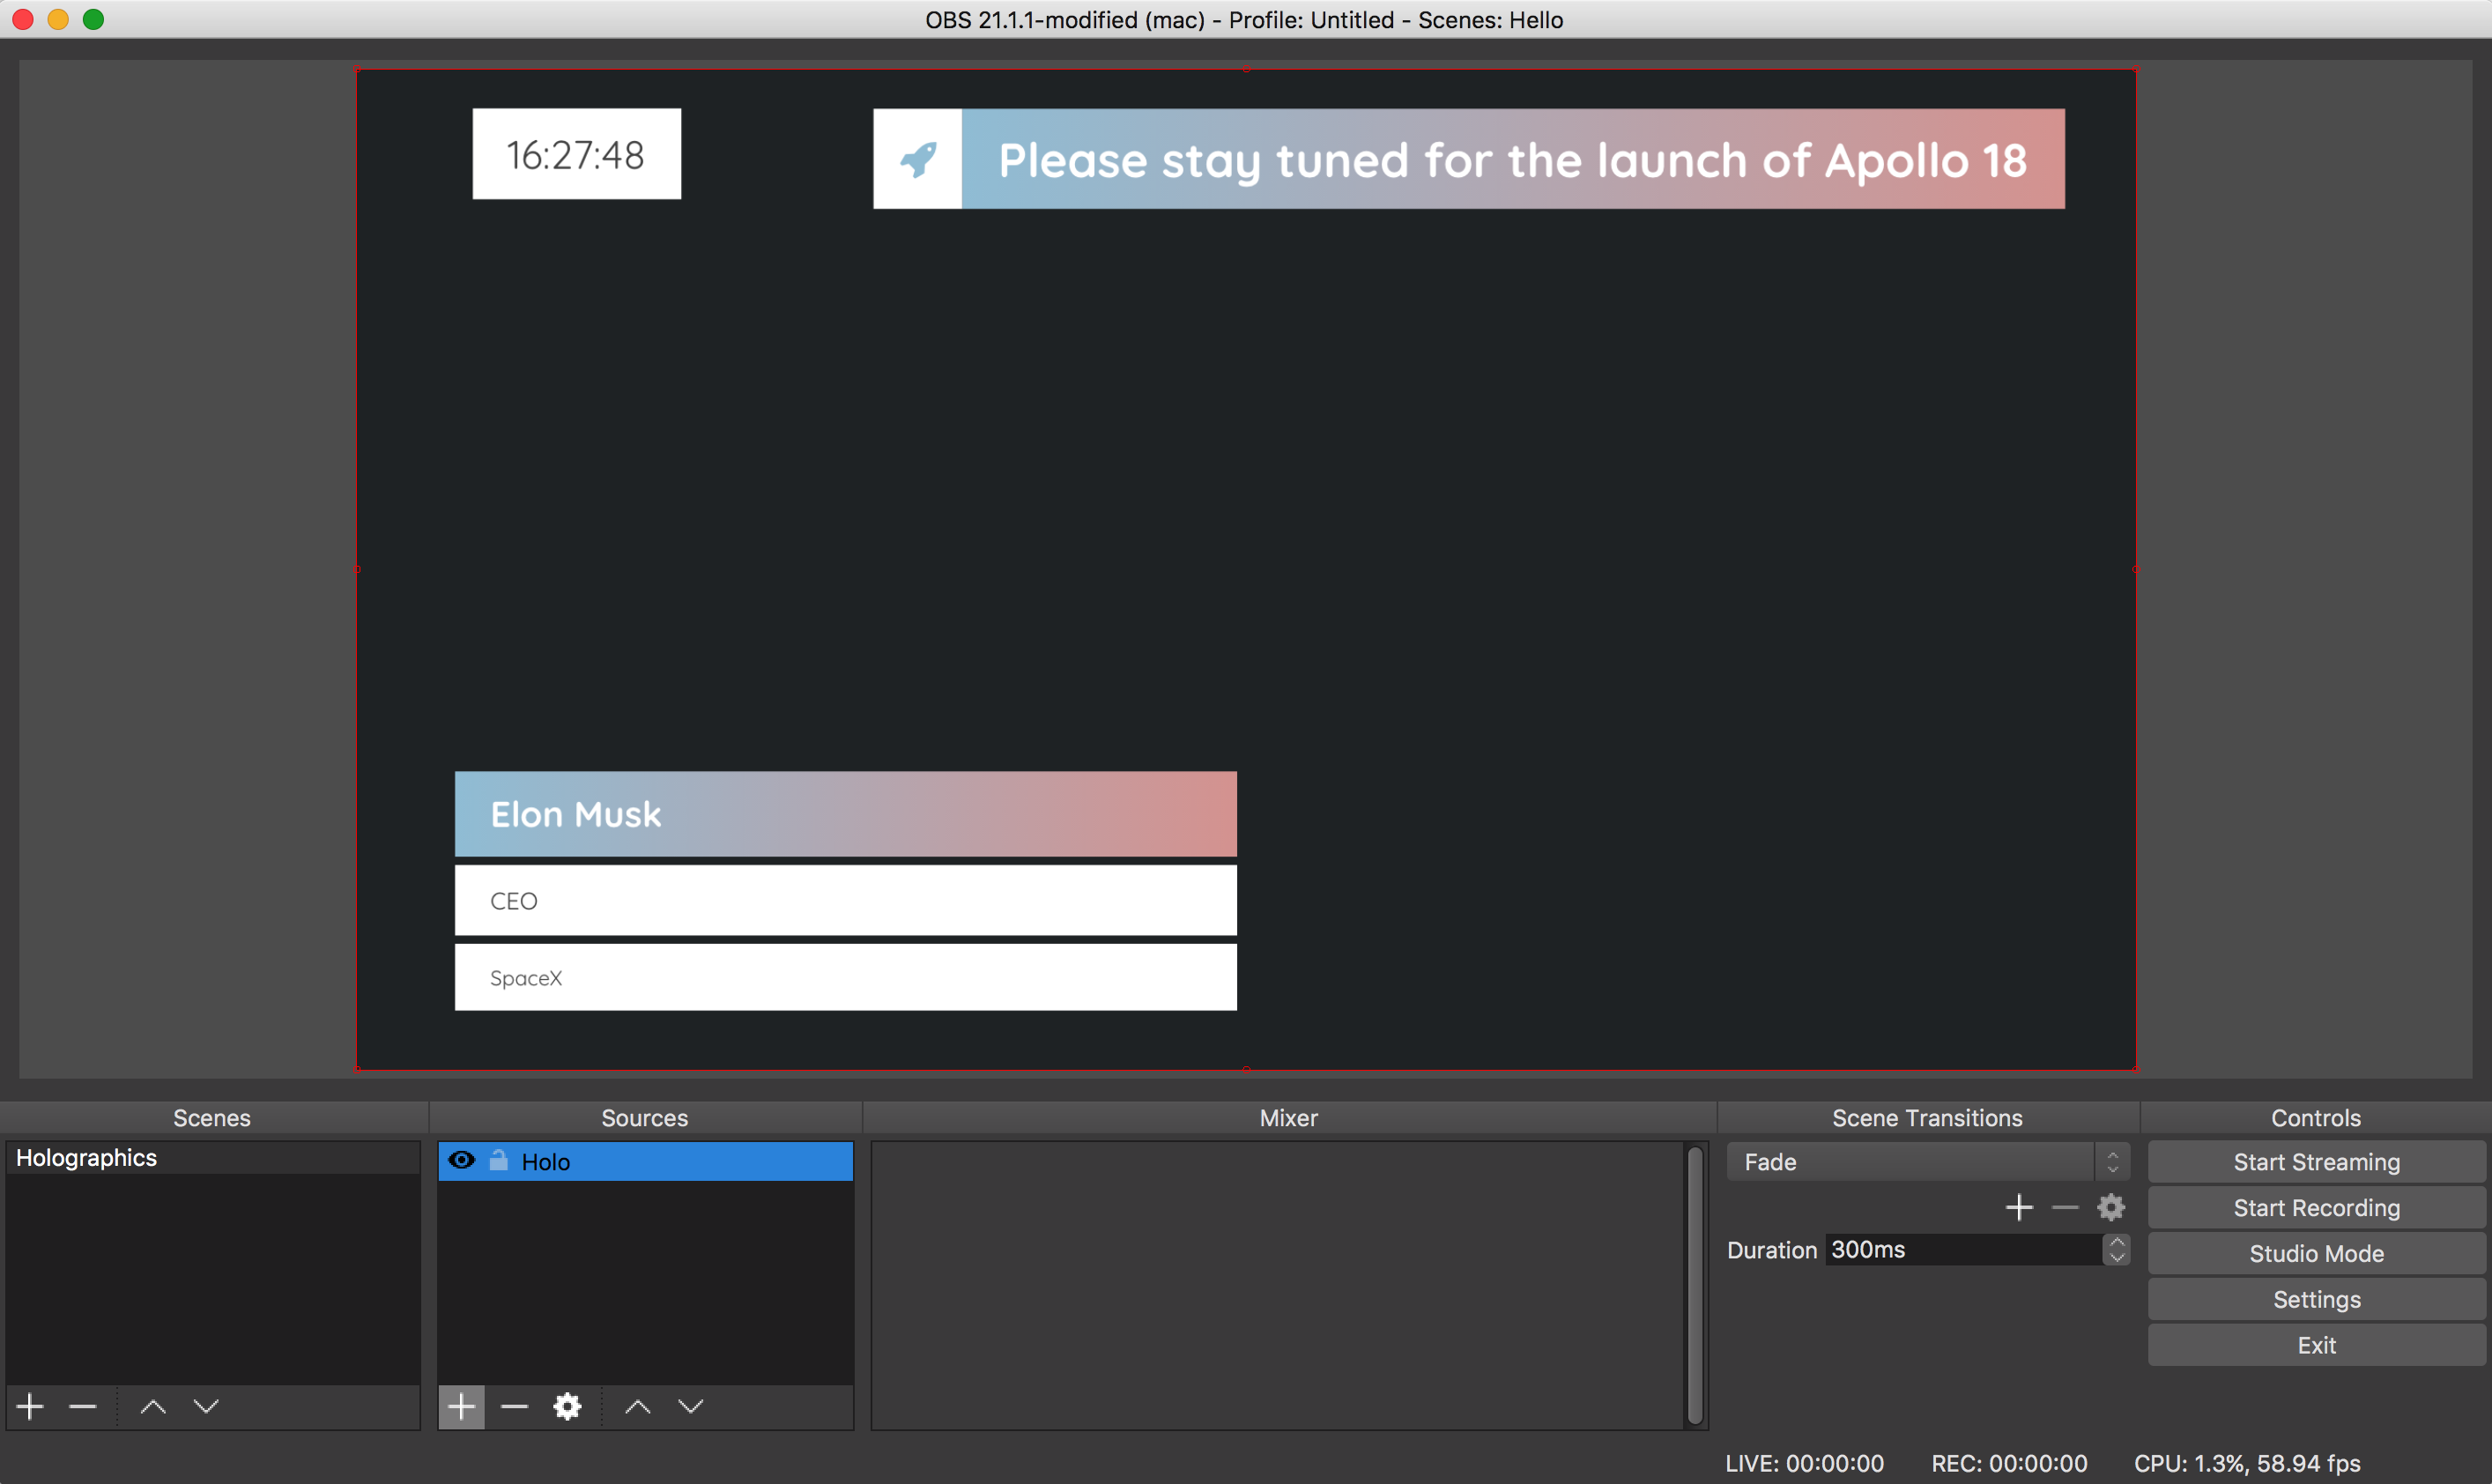
> The control interface >
> The render view when loaded into a web browser
Holographics is software-only, and needs third-party applications (such as Open Broadcaster Software (OBS), Vmix or a webbrowser) to be used in live production.
There are two parts to Holographics. The back-end part where you setup the way you want it to look and what information to display, and the rendering part. Both can be accessed simultaneuously on different screens and computers accross a local network.
The rendering part is 'loaded' into one of the supported applications, with a 'web browser' layer or clip type. All applications have a slightly different name for it but the result is always that a web page is rendered to a video signal.
How do I use it in production?
There are four different ways to incorporate those graphics into your live production.
| Output mode | Use with professional switcher | Transparency support | Animations |
|---|---|---|---|
| 1. Key & Fill | ✅ | ✅ | ✅ |
| 2. Software output | ❌ | ✅ | ✅ |
| 3. Chroma key | ✅ | ❌ | ✅ |
| 4. Atem Media Pool | ✅ | ✅ | ❌ |
Output modes are explained in more detail below.
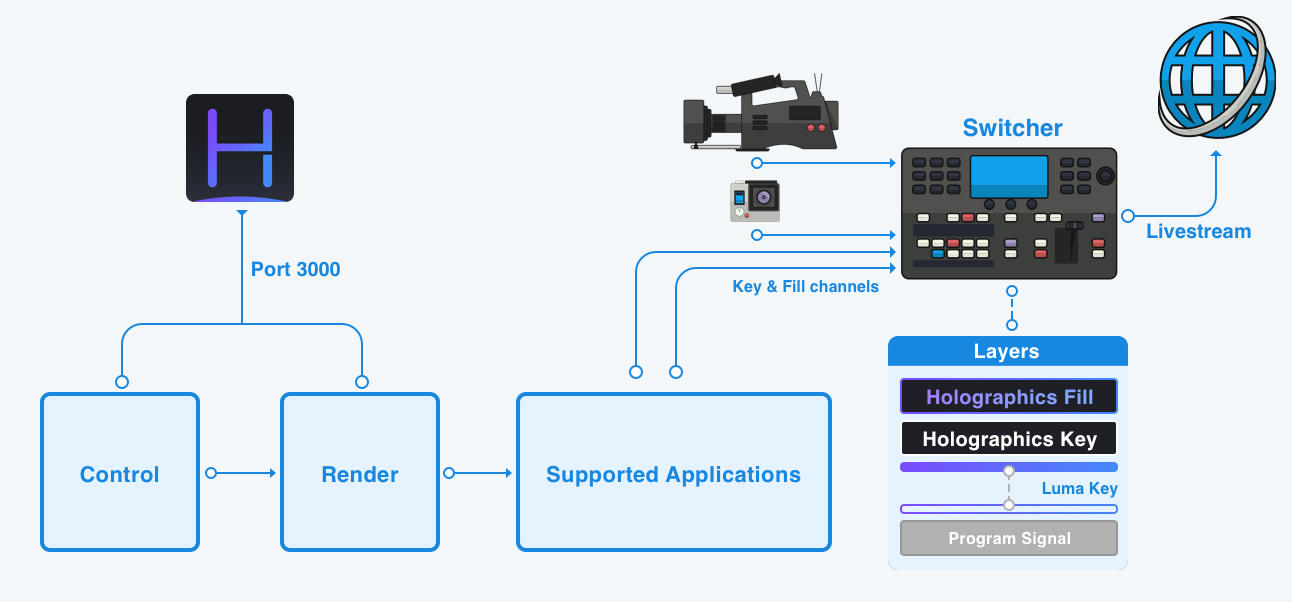
1. Output to key and fill
This method offers the best quality / reliability for a large production. In this method, two video signals are supplied to a video mixer, one with a color fill channel and one containing just an alpha channel.
A video mixer uses a keyer (usually a downstream luma keyer) to show only those pixels of the fill input that are white on the key input.
This method allows fully transparent graphics.
You can either use the built-in Decklink output feature in Holographics, or you can use any of the supported applications (OBS, V-Mix, CasparCG) to generate key & fill output.
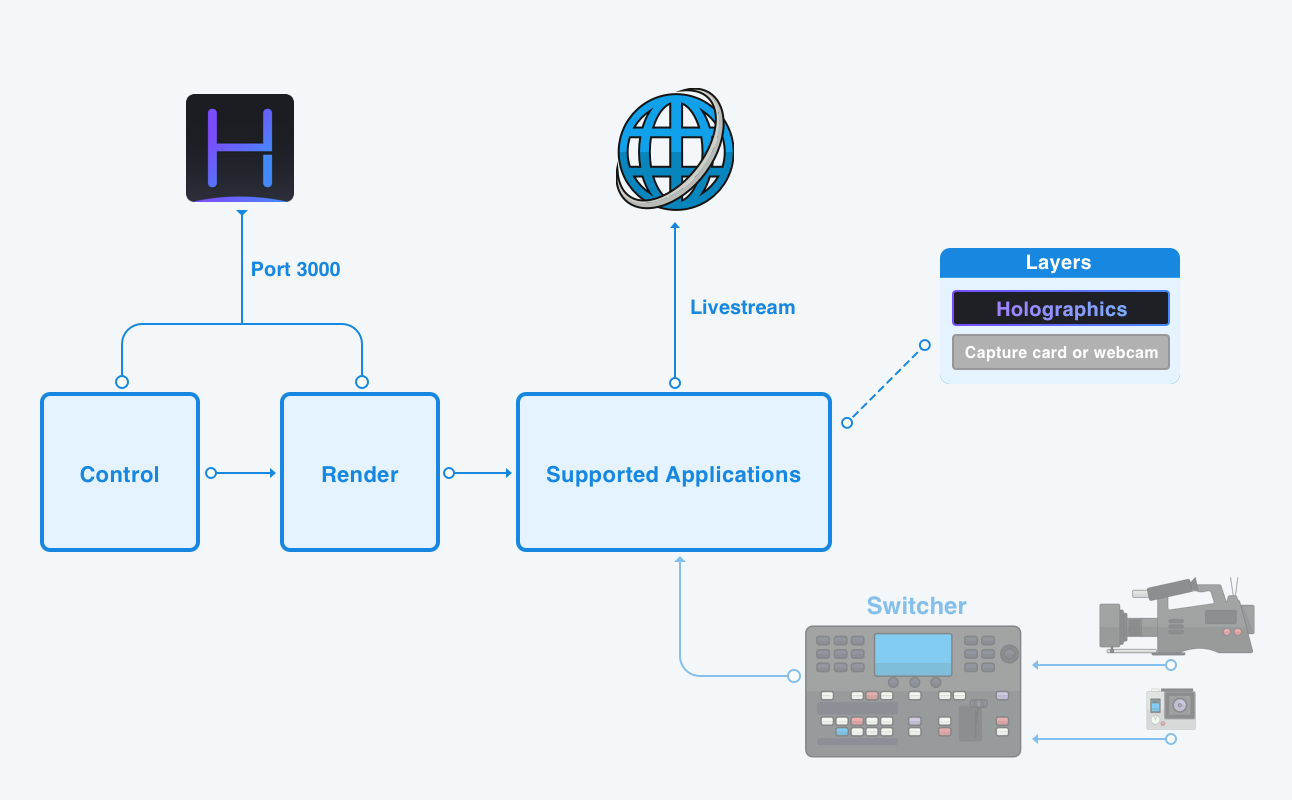
2. Software output
In this scenario, you use a software application we support, not only to overlay your graphics, but also to do your final livestream.
For example, you might have a capture card like a Blackmagic MiniRecorder connected up to a laptop. In your software switcher, like in OBS, you would configure the capture card to sit below your Holographics layer.
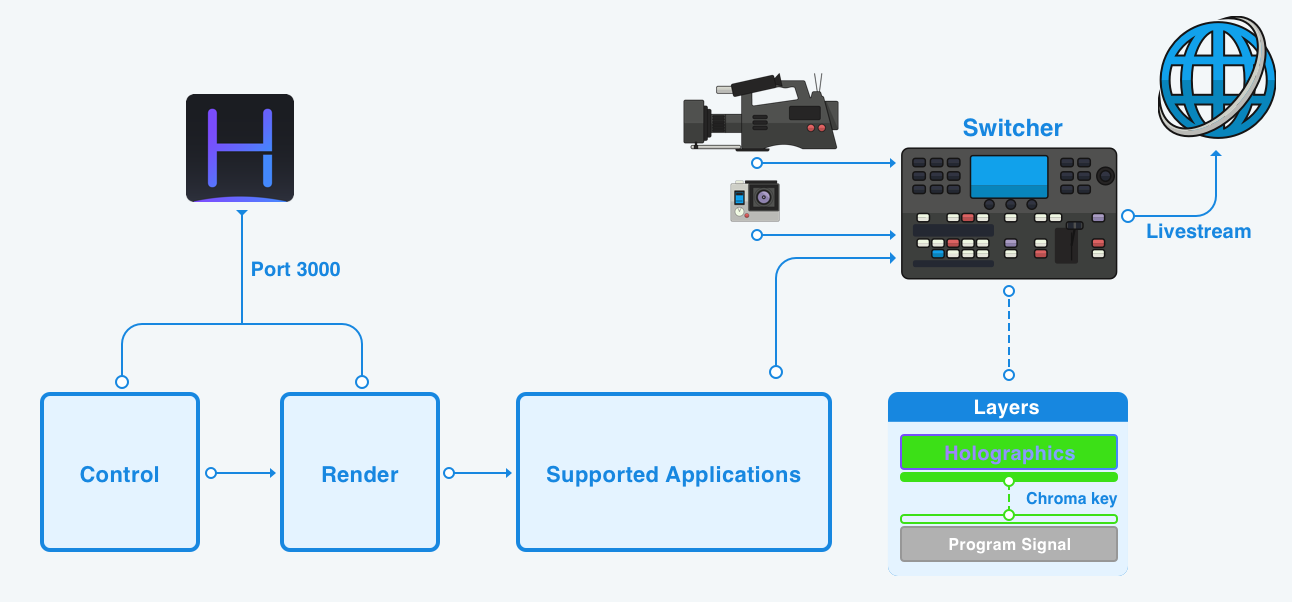
3. Chroma key (set a background color and use a keyer to overlay graphics)
In this method, the background of the Holographics render canvas is set to a solid color, for example black or green, to allow for chroma keying. This method however makes it very hard to create graphics with semi-transparent surfaces, glows or shadows, so it's not recommend for ideal image quality.
To do this, simply open the Holographics render page in a web browser and make that page fullscreen.
What applications can I use to render and output graphics?
| Application name | Overlay feature name | Decklink output | Key and Fill output | Price |
|---|---|---|---|---|
| Open Broadcaster Studio (OBS) | Browser Source | ✅ (from v23) | ✅ | Free (open source) |
| V-Mix | Web Browser | ✅ | ✅ (from v21) | \$ 60 |
| CasparCG (v2.2.0) | HTML Page | ✅ | ✅ | Free (open source) |
| Wirecast | Web Display | ✅ | ❌ | \$ 695 |
When you open the Holographics application, it automatically starts a webserver on port 3000 (or a port you specify) and opens the control interface.
To access the render view:
http://{your-ip}:3000/renderTo access the control interface:
http://{your-ip}:3000/control
The server allows a 'render view' on your system to be accessed anywhere on the local network. This render view is just an ordinary web page with some special code to show widgets and animations according to the settings.
Application Settings
📥 Updates
Here you can download updates that have been released by our developers. You have 3 options to choose from:
Stable channel: you only get major, production ready updates here.
Beta channel: you get frequent beta builds that may have the latest features buy may not be fully stable.
Alpha channel (daily builds): these are built sometimes several daily and will often be instable.
🤝 License
Here you can log in to your account to activate your license.
Refresh license: you must connect your computer to the internet once a month with a monthly subcription to verify your license is still active.
With a version-locked purchase you would only need to connect to the internet if you would like to activate your license.
Manage subscription: sends you to https://store.hologfx.io where you can login and manage your payment info and subscriptions.
Remove this license: removes any reference to your license from the current computer, but does not deactive the machine.
Manage machines: after logging into your account, allows you to activate or deactivate machines on your licenses.
⚙️Settings
Reset buttons
Click the red 'Revert Config' button twice to set all possible values back to default. This has a very high likelyhood of fixing problems if you're having any.
Diagnostics
Set this to 'yes' to allow Holographics to check-in with us and send crash reports back to our developers.
Logging mode
You can set this to three levels:
No debug functions: You will get no error messages unless Holographics chrashes
More information: You will get a developer tab in the application settings.
Tell me everything: Probably just don't use this as it will log very, very much.
🎨 Colors
Sets the global colors passed along to the active theme.
Note that every color is a RGBA value. That means that every color can be transparent as well. By clicking on a color field you can customize hue, brightness and transparency.
You can create multiple color palettes, with each one containing your 5 favorite colors. Color palettes can be easily applied to color variables for quick adjustments.
To make your life a bit easier you can enable color tools, this will show the color palette under every customizable color. To change the color of a widget you only have to click the color you want from your color palette.
Canvas Background
Sets the background for the renderer canvas. If you intend to key the background you might wish to set this value to solid green or black. If you're looking to overlay the renderer canvas on another feed (key & fill output), make sure you set the background canvas to transparent (default setting is transparent).
If you wish to key your background, make sure none of your other colors are similar to your canvas background.
🎚️ Size
Here you can change the 'global size' settings of all widgets, but any settings made in any of the widget menu's will override this setting.
Global Padding: this is the distance to the edge of the screen. Note that this does not apply when a widget is in a center position, only if they're at an edge. Holographics automagically adjusts the widget positions to look good in the aspect ratio of the screen.
Font Size: Sets the font size for all text on the screen at any time. If you increase this number, everything will get bigger.
Widget Padding: Sets the amount of 'breather' area around text inside a widget.
🏞️ Media Files
You can add images into Holographics, yeah!
📚 Theme selector
Select from a list of available themes. or create your own custom themes, fully customizable with CSS.
Themes are loaded from the user data directory, accessible by clicking the similarly named buttons. You can easily change the theme by just clicking on the theme you want.
🖌️ Theme Editor
Here you can customize all of your themes using a CSS based code editor.
🐞 Developer (optional)
Here you can see all kinds of magic stuff happening behind the scenes.
Widgets
In Holographics, the way you get graphics on screen is through Widgets.
Every Widget can be 'on' or 'off'. This is indicated by a green eye in the widget menu.
Every widget has position and sizing settings. The look and feel is determined by the theme.
You can have multiple instances of 1 widget, e.g. several clocks or multiple broadcasts messages.
For clarity you can rename every widget as well, e.g. "1 minute timer".
The widget menu appears on the left of the screen and allows you to instantly see which widgets are currently active. Click on the name of a widget to go to its respective control panel.
⚙️ Widget Properties
The video on the right should adequately explain how individual settings influence the position and size of a widget.
Widgets inherit their size from the 'global' size settings you've defined on the size tab. But, you can override those settings for individual widgets.
Basic positioning in Holographics can be seen as a 9 point grid. You can 'drop' a widget on any one of the 9 points in the grid.
You can offset the position on the vertical or on the horizontal axis by any amount of pixels.
With the combination of these settings it's possible to easily and quickly position a widget on any side of the screen.
Furthermore, the 9 point grid encourages you to adhere to broadcast safety margins by way of a 'global padding' setting.
Widget Appearance
Widget Wrapping: enable or disable a wrap around the widget, e.g. the dedault colors combined with your style or a background you imported. Every theme has control over how this wrapping is defined, so you can expect some differing results here depending on the theme you have selected.
Widget Position
Horizontal Position
Set horizontal position to left, center or right.
Horizontal Offset
Set the amount of percent that the position should be set to the left (-..%) or right (..%) from the preset (left, center or right) position. The unit is the percentage of the total screen width.
Vertical Position
Set vertical position to top, center or bottom.
Vertical Offset
Set the amount of percent that the position should be set to the bottom (..%) or top (-..%) from the preset (top, center or bottom) position. The unit is the percentage of the total screen height.
Render Edge Margin
Set the amount of room the widget should be away from an edge of the screen.
Widget Sizing
Widget Padding
Sets the distance from the text inside the widget to the widget edge.
Font Size
Set the size of the font, essentially scaling the whole widget up and down.
Width Override
Sets the width of the widget to an absolute amount based on the amount of renderer width minus the distance from edge of the screen.
Height Override
Sets the height of the widget to an absolute amount based on the amount of renderer height minus the distance from the edge of the screen.
📣 Broadcast Message
This widget simply displays a message on-screen. You're free to type any message you wish. You can also add in any valid HTML to your message text.
The icon section allows you to add an icon. It will be shown in front of your text. Awesome.
🌃 Image
The image widget lets you choose an image. Images are loaded from the 'mediafiles' directory in the user data dir, accessible by clicking the 'open media files dir' button in the Media Files tab. If you add an image to this directory, it will show up automatically in Holographics.
📜 Ticker
Shows a scrolling ticker bar (usually at the bottom of the screen) with general tidbits of information. You can add as many entries as you want & you can set the speed from very slow to beyond imaginable.
🕒 Clock
Shows the current time in 12 or 24 hour format.
👏 Lower Third
Allows you to create 'person' title plates to show viewers who is speaking, what company they're from and what their function in that company is.
📺 YouTube Video
Paste a YouTube URL to show a YouTube player in the render view.
You can select an aspect ratio for the video to stick to.
You can also select if the video should play once or play on a loop.
⏲️ Countdown
Shows a countdown timer on screen. You can set a target date / time by typing in the target field, or a remaining number of seconds.
🎇 Particles
Just some floating dots enjoying life, sometimes connecting with each other.
Themes
How themes and colors interact
Holographics uses a three step process to render widgets on-screen.
First, global settings are taken and calculated. Then they're piped into a theme CSS renderer, which looks a lot like CSS but is slightly different in that it can accept and calculate variables.
After that, CSS code is rendered for each individual widget using a widget renderer function. Since each widget can have position and sizing overrides defined, global and widget variables are combined into a 'merged variable' sheet.
All of this happens in milliseconds and takes place every time a setting is changed.
The colors you select in the style panel are available as variables to the theme, and every theme can decide for itself how to apply those variables. Therefor the effect of certain color choices is a little different for every theme and you may need to experiment.
How those variables are used changes a little bit for every theme. For example, on some themes the primary color may be used as the color to a border or glow. On other themes it might be the text color.
In some themes, a gradient between color A and B is created automatically.
Play around with themes and colors to see what you can create!
Outputs (BETA)
Outputs are a new feature we're building into Holographics. We've decided to release an early version of this feature so users can start using it today, and we can gather some feedback.
These features do have a bit of a manual to them however, which we're detailing below.
Output with PNG
This feature allows you to output stills from Holographics directly to a render folder as PNG files. For example, it allows you to export all the names in a lower third to separate PNG files with one click. This is super helpful for fast turnaround post production.
Output directly to Atem Media Player
Using our direct connection with Blackmagic Atem video switchers, we can upload stills directly to the Atem Media Pool and activate them on media players built-into the Atem. This is by far the easiest and fastest way to integrate live graphics into a production running on an Atem.
To do so, it uses a reverse-engineered protocol that is unsupported by Blackmagic. That means you do so entirely at your own risk. Your Atem model and firmware might differ from ours, and so you might have varying results. Strongly recommend testing thoroughly before using in production, and using a wired connection at all times.
Decklink Output
Using the Decklink Output feature, it's possible to output Key & Fill directly from an UltraStudio or Decklink device, without going through an external application like V-Mix, OBS or CasparCG.
Only devices supporting key & fill output in RGB colorspace are supported for the moment (specifically RGB 4:4:4). To find out whether your device supports this, look here for UltraStudio devices and here for Decklink devices. We personally use an UltraStudio HD Mini which supports RGB up to 1080p30 and this has been working great. Make sure keyer is set to 'external' to get key & fill output.
Output via third-party applications
In general, the procedure to output Holographics over your video feed is similar for every application.
It involves setting up a 'browser' layer, sometimes manually scaling it to the size of your output resolution, and copy-pasting the Holographics render link.
If you want to output to a video mixer and chroma key the background, you can set the Holographics canvas background using an option in the 'style' menu.
Most of these applications have an option to do 'full screen output' of the program video signal. For example in OBS, it's called Fullscreen Projector. In V-Mix it's external output.
If you want to output key and fill, the canvas background must be fully transparent.
Using with OBS
Setting up Holographics as a layer
Step 1: Open OBS and setup appropriate resolution and framerate settings
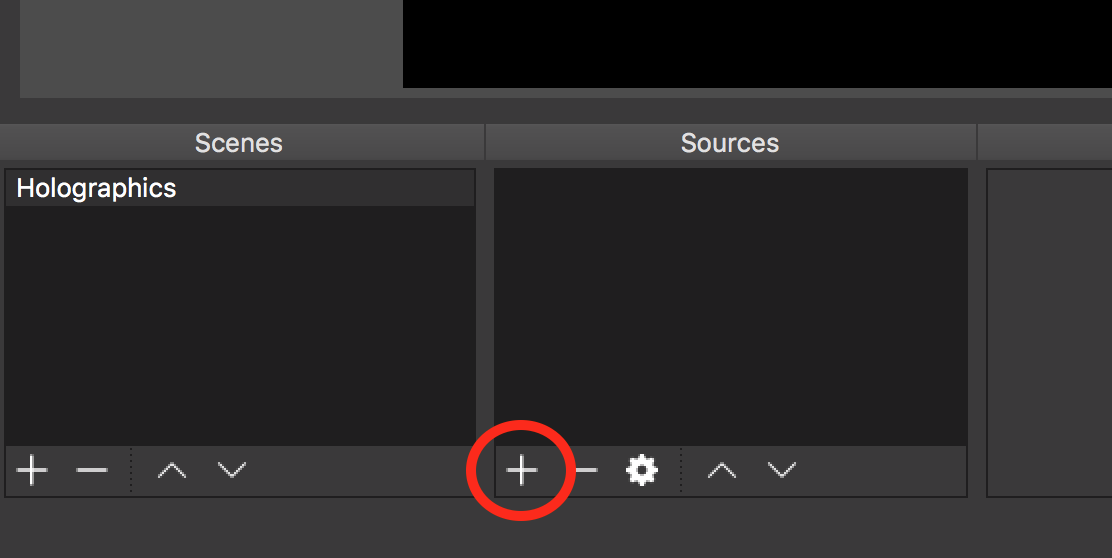
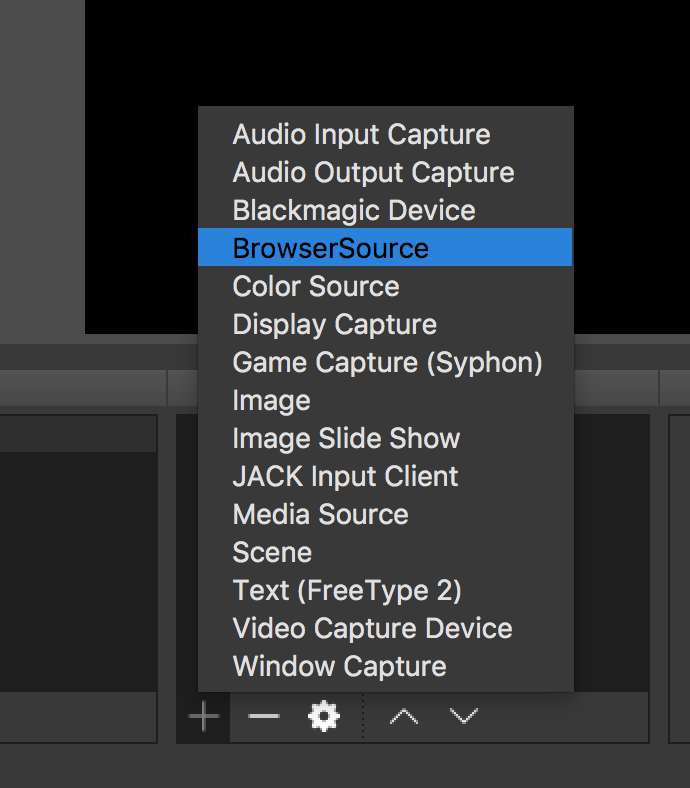
Step 2: Create a new Browser Source layer with this button
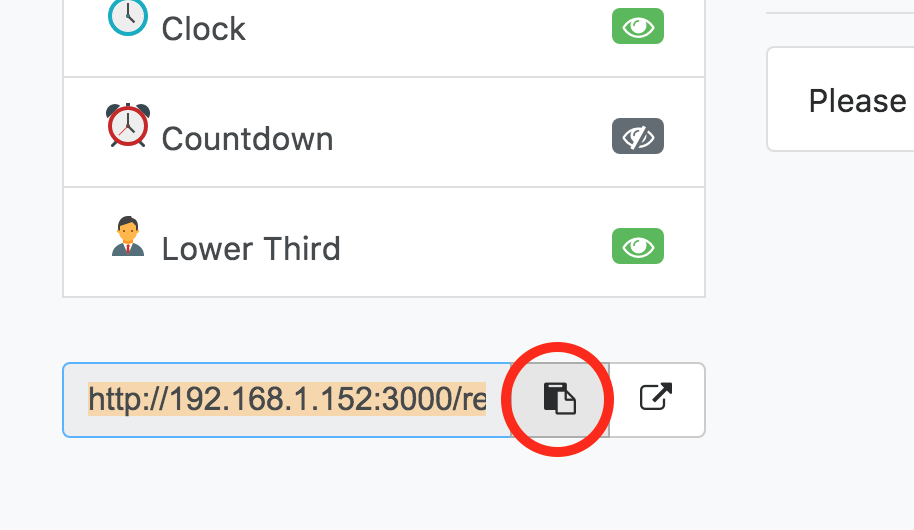
Step 3: Copy-paste the Holographics render URL by pressing this button in the user interface
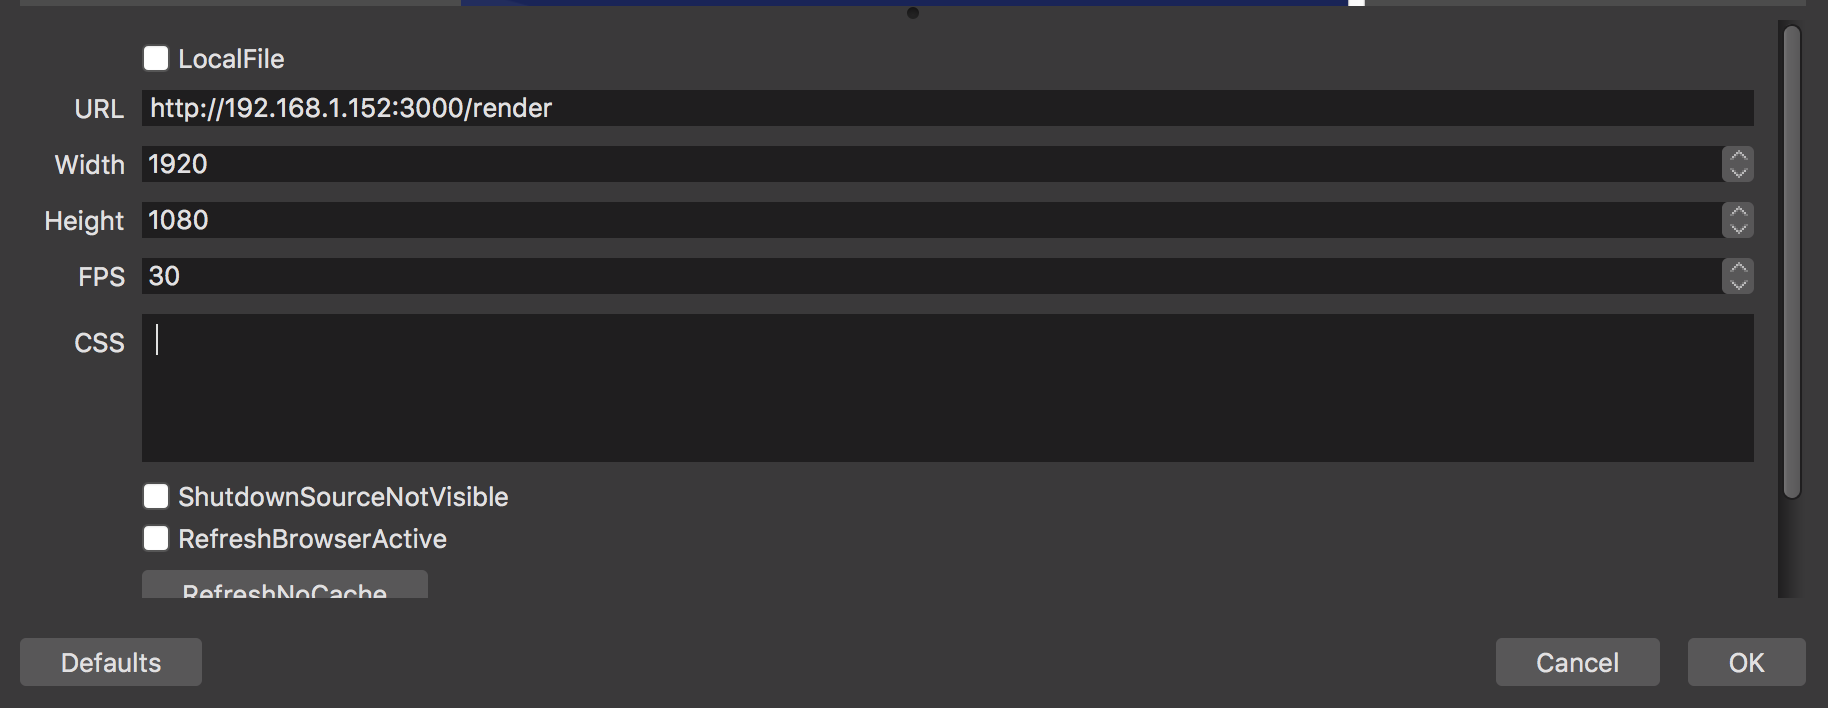
Set the resolution and framerate to whatever your OBS canvas settings are. Clear the additional CSS.
Step 4: Be a happy Holocamper!
Setting up Key and Fill output
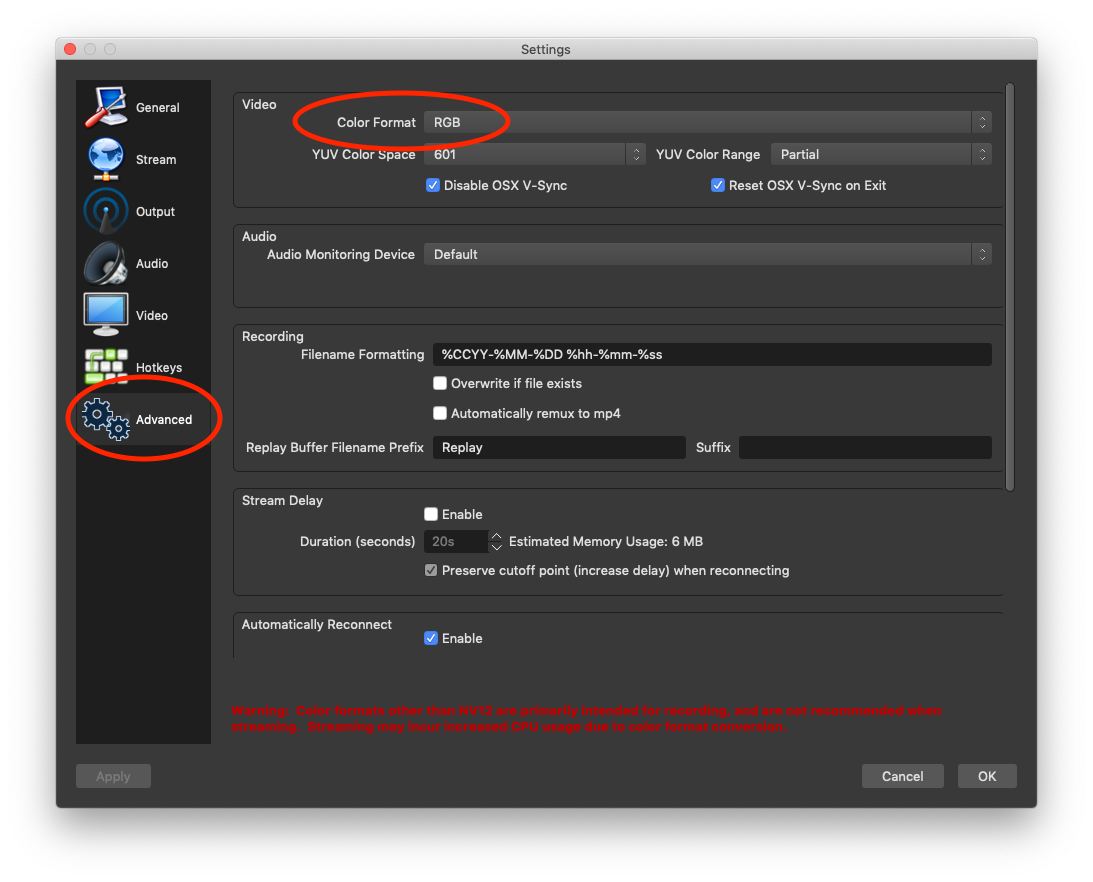
Step 1: Set color space to RGB: Settings -> Advanced, under Video: set Color Format to RGB.
Step 2: Get the decklink output panel by clicking tools in the top menu bar on mac, once the panel pops up: select your device, set the resolution, framerate and keyer type.
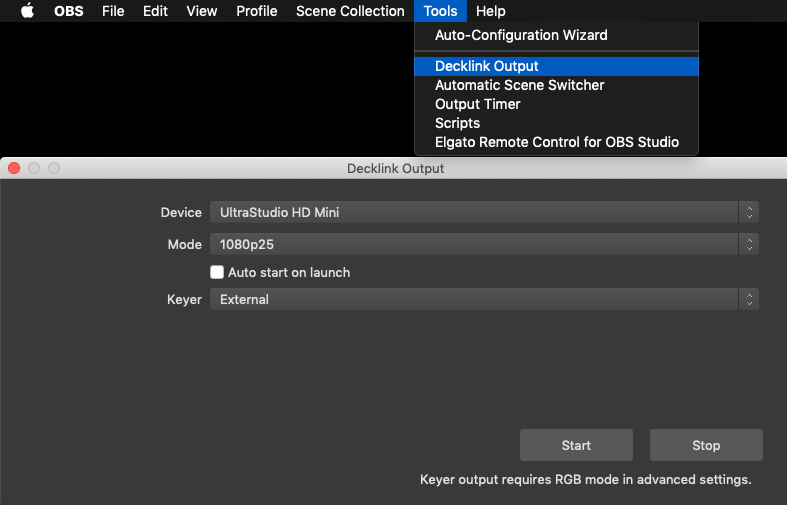
Step 3: press start and you're done!
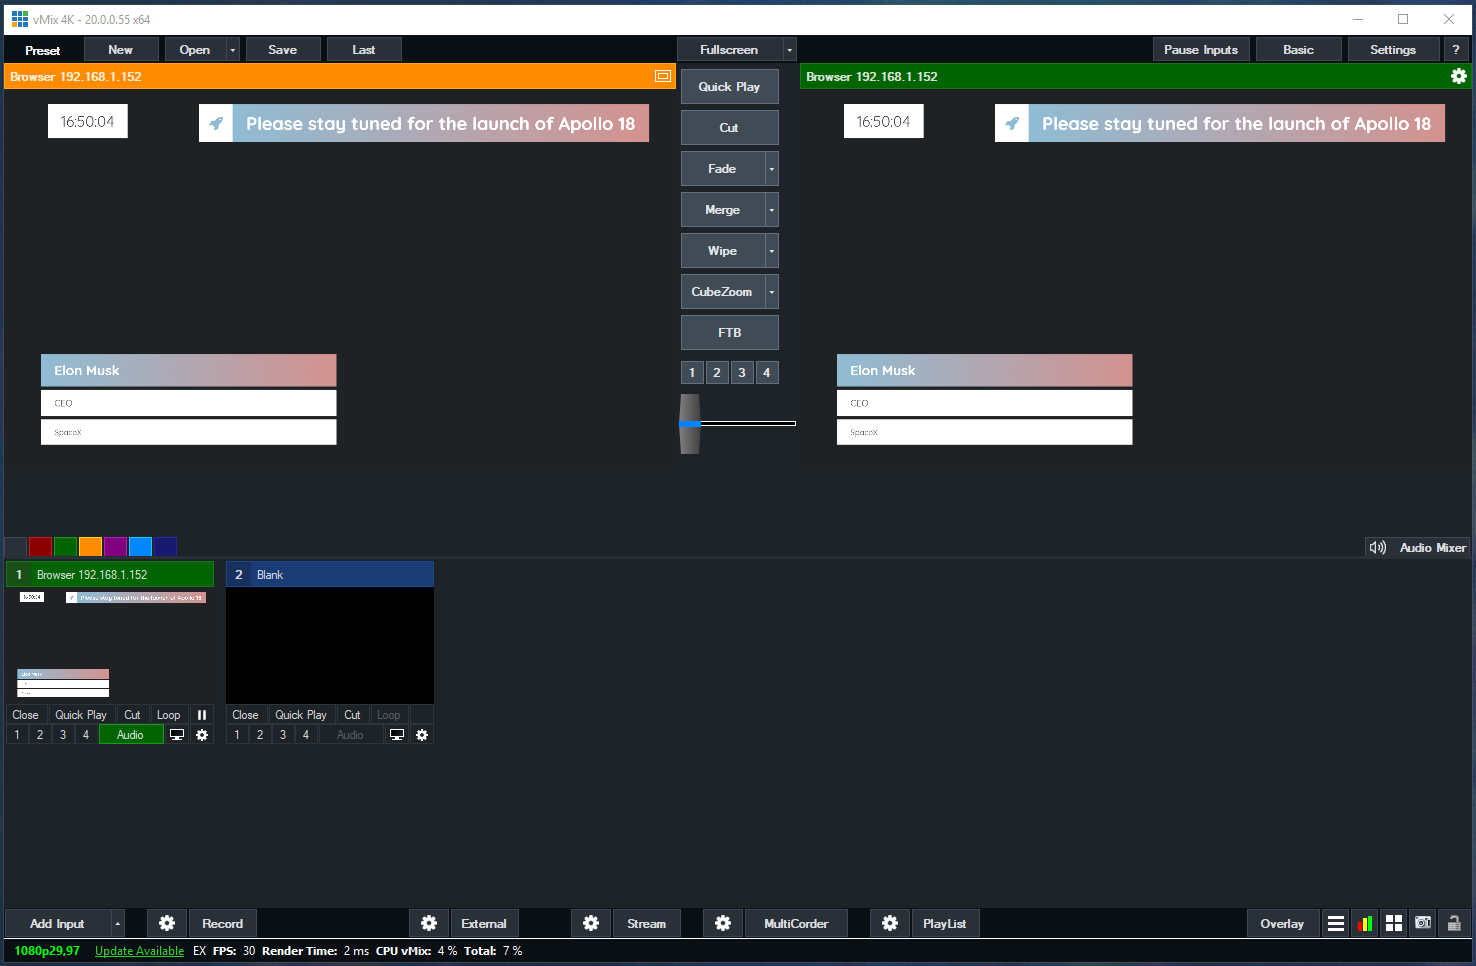
Using with V-Mix
Setting up Holographics as a layer
Step 1: Copy-paste the Holographics render URL by pressing this button in the user interface
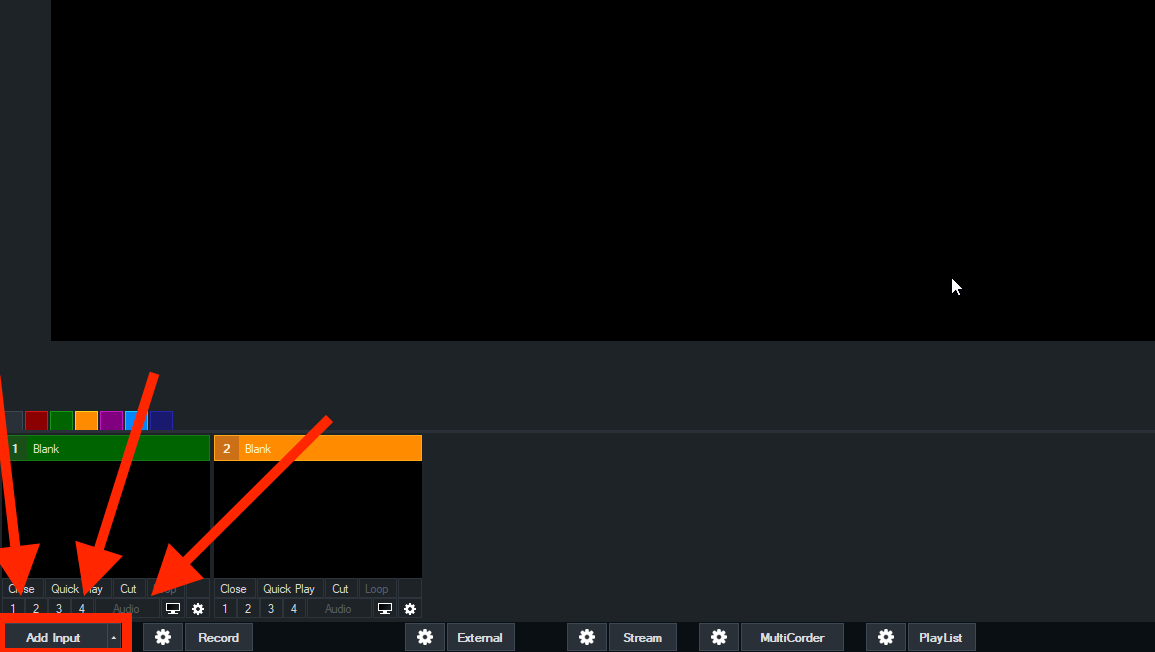
Step 2: Back in vMix, click 'add input' to start adding a new source to vMix
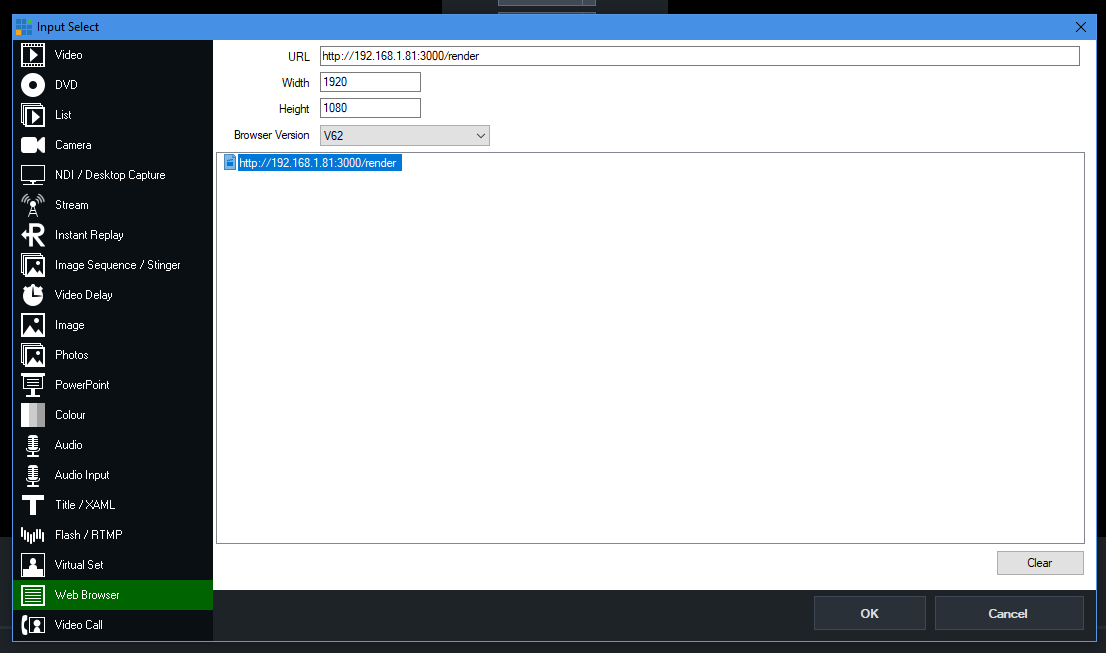
Step 3: Add a web browser and configure it as follows:
Step 4: Be a happy Holocamper!
Setting up Key and Fill output
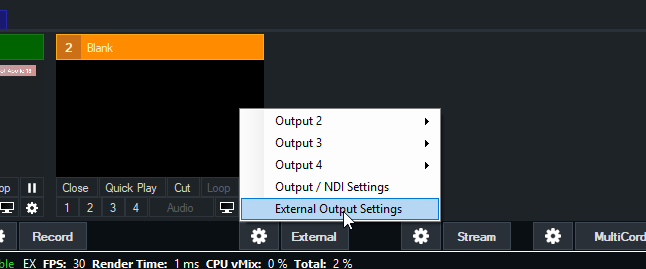
Step 1: Go to the vMix external output settings
Step 2: Enable 'external renderer' and configure it to output to your Blackmagic Device
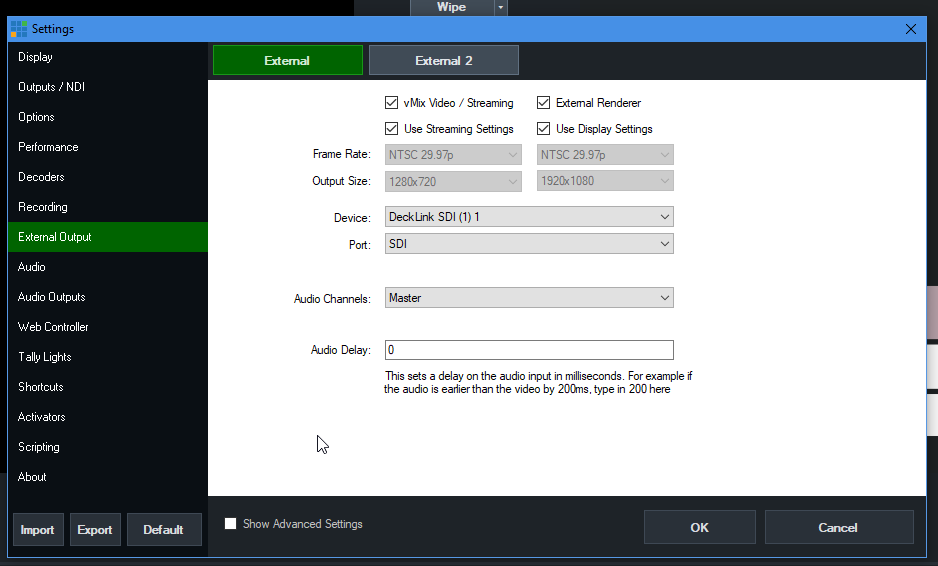
Step 3: If your output device supports key and fill output, a 'alpha' selector will appear. Set it to 'Premultiplied'.
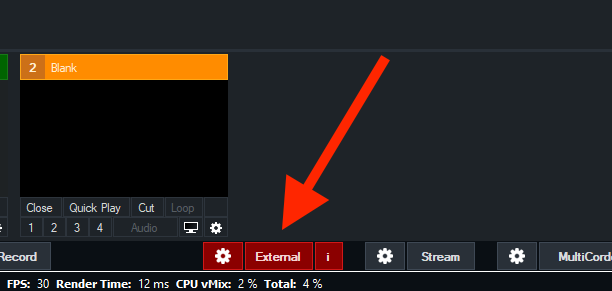
Step 4: Close the window and enable the renderer by pressing the 'external' button in the UI
Using with Wirecast
Which versions are supported?
| Version | HTML overlay supported | Decklink output |
|---|---|---|
| v6 | ❌ | Fill only |
| v7 | ✅ | Fill only |
| v8 | ✅ | Fill only |
| v9 | ✅ | Fill only |
Setting up Holographics as a layer
Step 1: Copy-paste the Holographics render URL by pressing this button in the user interface
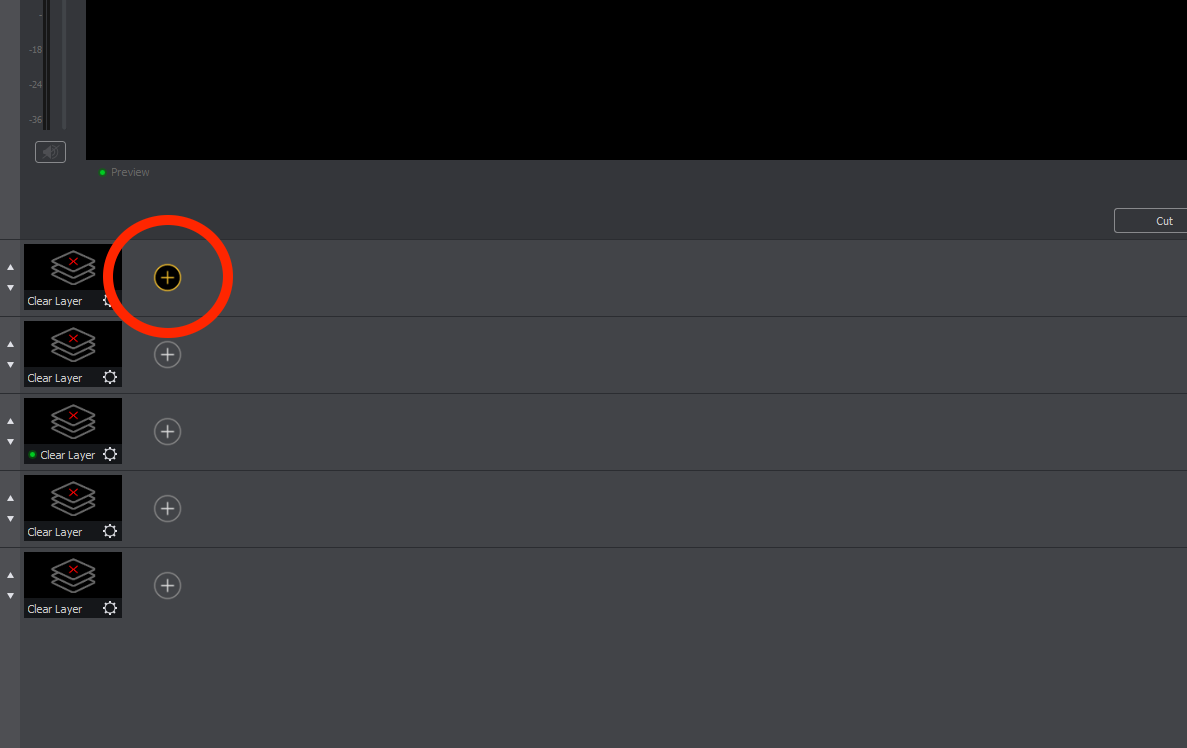
Step 2: In Wirecast, use the small 'plus' button to create a new shot
Step 3: Under the 'network' tab, select 'Web Display'
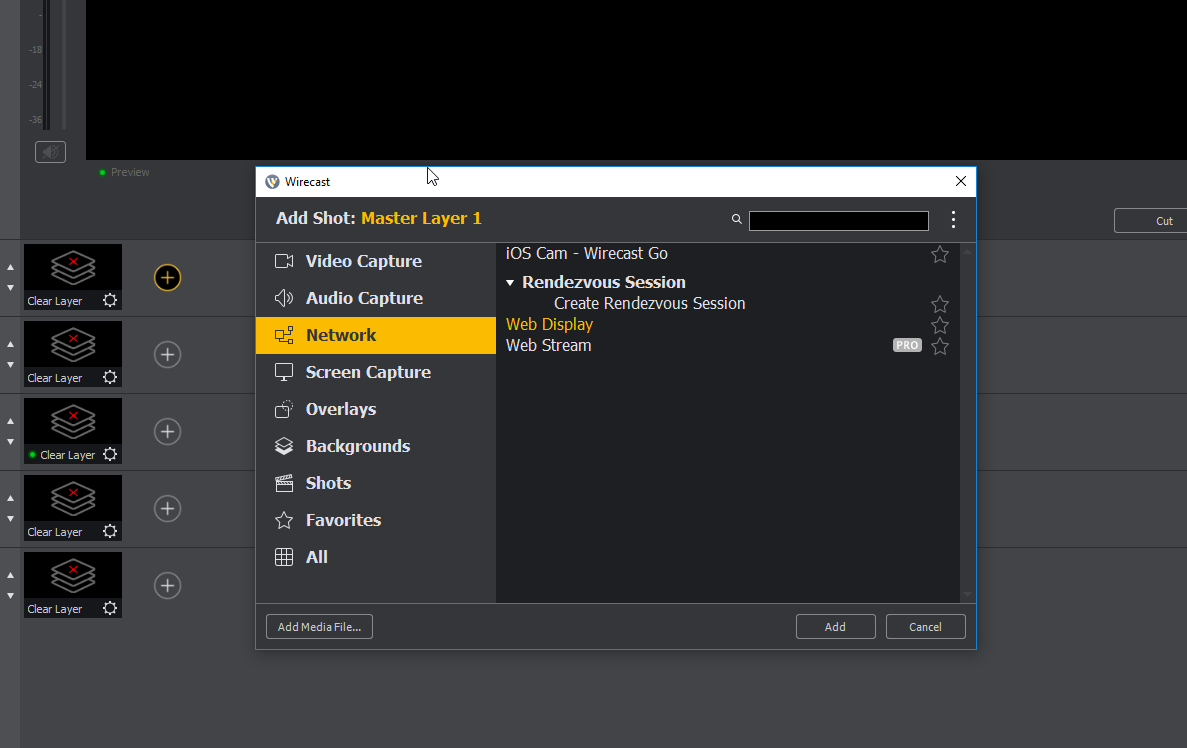
Step 4: Paste the Holographics render URL and set the resolution and framerate to the appropriate values. Make sure 'transparent background' is checked.

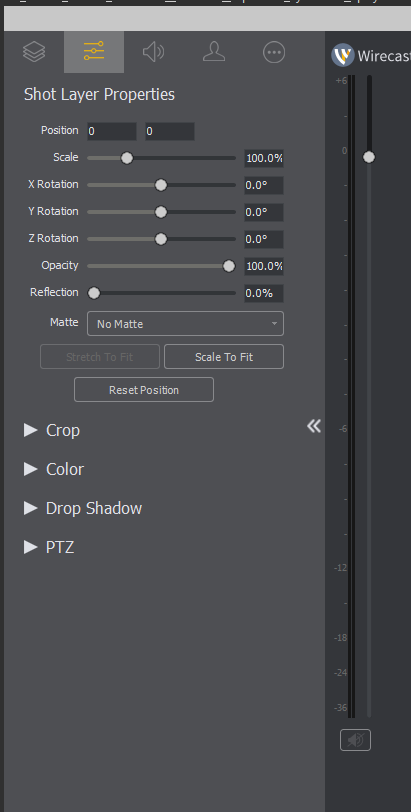
Step 5: You may have to adjust the layer transform settings. Ours auto-scaled to a smaller-than-fullscreen value. Here's what the appropriate values looked like for us:
Using with CasparCG
Note: Holographics is only compatible with CasparCG v2.2.0.
CasparCG is an output system to be reckoned with. Besides rendering HTML fluidly, it allows playout of video files with and without alpha. It also supports Key and Fill output on Blackmagic Decklink cards. It does have some learning curve, but for those with the knowhow and need to setup a professional system it's a very good solution to do both playout and graphics from a single system.
- Download the v2.2.0 of CasparCG
- Extract to a folder somewhere on your hard drive
- Follow the guide on this page to configure CasparCG. In order to get key and fill output, you need to have a supported device and set keying to 'external' (to indicate that an external device will luma key the output).
- Download and install the CasparCG client as a simple way to control it
- Add an HTML Page type layer to the playout rundown
- Copy-paste the render URL from the Holographics admin interface into the URL field of the HTML Page item in the rundown
- Hit F2 to cue up the Holographics layer
Bitfocus Companion
Companion is a tool that integrates with the reasonably priced Streamdeck to offer a show control automation system and control surface, all from an open-source codebase.
A module for Holographics support in Companion is in the works but is currently in beta stage. You can get a latest build of Companion here that includes this module:
Troubleshooting
Holographics crashed!
An armed team of highly-trained assassination monkeys has been dispatched to deal with Floris. This time, they'll catch him for sure.
No output gets rendered!
If you're trying to preview in a webbrowser, make sure it's the latest version of Google Chrome or Safari. No other web browsers are supported for preview output.
If that wasn't the problem, try resetting all settings back to defaults by going to Settings > Reset Universe.
It doesn't work in 16K!!!
u kiddin' me